Print Durability Comparison Guide: 5 Methods Benchmarked
1. Sourcing Realities: What Design Teams and Procurement Buyers Overlook Regarding Print Durability and Substrate Matching
Walk into any returns warehouse. You will find pallets of 65/35 poly-cotton work shirts where the screen print cracked after 18 washes. You will find DTF transfers that lifted at the collar seam because the film’s shear adhesion dropped below 1.8 lb/in. And you will find sublimated tank tops on 100% cotton – a chemical impossibility – that faded to 20% density after the first laundry cycle.
The failure is never one variable. It is a mismatch between print chemistry and substrate polymer structure, or between stitch density and fabric panel weight. This guide benchmarks five methods: screen print, DTF, sublimation, heat transfer, and embroidery. We focus on measurable thresholds – wash cycle survival, peel adhesion in lb/in, crocking values, and cost per unit at real MOQ floors. No decorative language. Just the numbers that determine whether your print survives the third month in the field.
2. Textile Physics: The Structural Science Behind Dimensional Fabric Texture Adhesion and Ink Compatibility
Print durability starts with molecular compatibility. Polyester Sublimation Cross-Linking Chemistry requires opening the amorphous regions of polyester chains at 400°F. Disperse dye gasifies, diffuses into the polymer, and forms covalent bonds. The resulting dye-polymer matrix cannot crack – the color is inside the fiber. But this fails entirely on Organic Substrate Ink Non-Compatibility with cotton. Cotton lacks those amorphous regions. You get under 15% dye transfer, and the residual dye migrates to adjacent garments during storage.
Stitch Density Panel Weight Disproportion affects embroidery. Run 13,000 stitches per square inch on a 140gsm single jersey. The needle penetrates 1,500 times per square inch, each hole displacing yarns. A 90g/m² backing cannot stabilize the knit. Result: 8% shrinkage differential between logo area and body after industrial laundry. The fix: keep stitch density under 10,000 SPI and match backing weight to 40–60% of fabric panel weight.
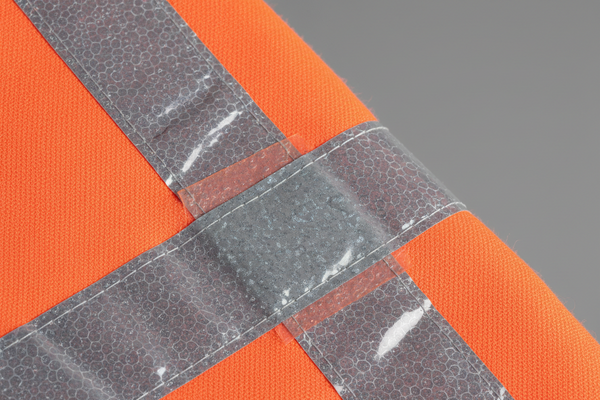
DTF Shear Peel-Off Degradation initiates at the film’s cut edge. The polyurethane adhesive layer (75–150 microns) bonds to fabric via heat-activated cross-linking. On high-texture fabrics – piqué, waffle knit, ripstop – the film bridges across recesses. Those bridges have zero adhesion. Washer agitation creates shear stress at the bridge edges. After 10–30 cycles, the film lifts. Mandate a shear peel test (ASTM D751): stretch printed fabric 30% on a tensile machine. Acceptable peak load for activewear: >2.5 lb/in.
Vector Node Tensile Modulation applies to screen print and DTF artwork. Vector nodes – points where curved paths change direction – create localized ink thickness variations when rasterized. A node with tight radius (0.5mm) forces ink to pool, forming a stress riser. Under repeated flexing (shoulder blade zone of a tank top), that pooled ink cracks first. Engineering fix: smooth vector paths to minimum radius 1.5mm before outputting to separation software.
3. Workshop Execution: Calibrating Print Production Lines
Factory execution errors kill more print contracts than material incompatibility. Here is what happens inside mid-tier shops when you are not auditing.
Screen print mesh tension loss: Newman roller frames hold 25–30 Newtons/cm² mesh tension. After 50 production runs, tension drops to 18 N/cm². Low tension causes off-contact issues – the screen does not snap back cleanly, leaving fuzzy edges on logos. Buyer inspection: run a fingernail across the print edge. If you feel a raised, soft edge instead of a crisp step, reject the batch.
DTF powder curing inconsistency: DTF requires two-stage cure – ink gel at 250°F, then powder adhesive melt at 320°F. Conveyor belt speed variance of ±0.5 ft/min changes dwell time by 4 seconds. Under-cured powder leaves tacky film that picks up lint. Over-cured powder becomes brittle, cracking at first fold. Require thermocouple logs from three points along the curing oven. Acceptable variance: ±10°F.
Sublimation calendar pressure drop: Roll-to-roll sublimation press needs 60–80 psi across the nip roller. As the roller heats to 400°F, metal expansion changes nip pressure. Many shops do not recalibrate. Result: uneven dye transfer – light in the center, heavy at edges – visible as mottled prints on large surfaces. Audit: ask for a pressure strip test (carbon paper between fabric and paper) showing consistent transfer across roller width.
Heat transfer vinyl (HTV) weeding errors: HTV requires weeding excess vinyl after cutting. In high-volume production, weeding leaves micro-tags – 0.5mm vinyl fragments still adhered around letters. These tags catch on washer baffles and peel the entire letter. Inspection: examine each transfer under 2x magnification before heat pressing. Reject any sheet with tags.
4. Risk Factors: Preventing Severe Operational Flaws in Bulk Runs
You have signed the purchase order. Now risks shift from design to production and logistics. Here are the three most expensive failure modes from real audits.
Organic Substrate Ink Non-Compatibility (repeated from field data): A buyer ordered 1,500 cotton tank tops with sublimation printing because the supplier offered a “low MOQ”. Sublimation does not bond to cotton. The print washed out to 10% of original density by cycle 5. The buyer paid for the garments, the printing, and a second run with screen print. Total loss: $12,500. The rule: sublimation is for 100% polyester or minimum 80/20 poly-cotton blends. For cotton, use screen print, DTF, or discharge print.
Stitch Density Panel Weight Disproportion: A 10,500 SPI logo on a 130gsm fine knit jersey tank top. After three industrial laundry cycles (160°F, 50G force extraction), the logo area shrank 8% while the rest of the shirt shrank 3%. The differential created a permanent blister – a raised bubble around the embroidery. The fix: reduce stitch density to 7,500 SPI and switch to a 40gsm fusible weft-insertion backing.
DTF Shear Peel on High-Movement Zones: A print buyer placed a full-back DTF design on 100% cotton tank tops for a fitness brand. The print extended over both shoulder blades. At the natural flex point between blades, the DTF film cracked and peeled after 8 washes. Failure mode: film elongation at break (150%) did not match fabric elongation at the bias (35%). Stress concentrated at interior nodes. Audit solution: demand a tensile test on printed fabric with 50mm gauge length. At 30% elongation, the print must show no cracks under 2x magnification.
5. Procurement Ledger: Cost Amortization Specs for Bulk Print Method Drops
Cost per printed garment is not simply print price plus blank cost. You need to amortize setup fees, sampling, and failure risk across contract volume. Here is the real ledger for 500-unit runs.
Screen Print (plastisol): Mesh frame per color ($25–45, reusable). Emulsion and reclaim ($0.50 per color per run). Ink ($0.03–0.08 per print depending on coverage). For a 2-color logo on 500 pieces, cost per print = $0.85–1.40. Setup for two colors = $50–90 amortized across the run. The trade-off: color count drives setup cost. A 6-color logo jumps to $2.80–4.20 per print.
DTF (direct-to-film): Film printing ($1.20–2.80 per square foot). Powder adhesive ($0.10 per print). Transfer labor ($0.30 per piece). For a 4”x4” logo (16 sq in), cost per print = $0.50–1.20. No setup fee. The risk: edge lift on textured fabrics adds 5–8% rework cost if not caught early. Amortize $0.10 per piece for QC peel testing.
Sublimation: Transfer paper ($0.40–0.60 per square foot). Disperse ink ($0.08 per square foot). Calendar labor ($0.25 per piece). For an all-over print on a tank top (approx 18”x24” print area), cost = $3.80–5.20 per piece. Setup includes a $150–300 strike-off fee. Amortize that across units. MOQ floor: 400 pieces (600 yards of fabric). Below MOQ, add $0.50–0.80 per piece surcharge.
Heat Transfer (vinyl): Vinyl roll cost ($8–15 per square foot). Cutting labor ($0.20–0.40 per piece). Weeding labor ($0.30–0.60 depending on complexity). For a 4”x4” single-color logo, cost per print = $1.10–2.00. Setup: $15–30 for cut file. Best for under 200 pieces. Above that, screen print or DTF becomes cheaper.
Embroidery (for comparison): Digitizing fee ($35–85 per logo). Hooping labor ($0.40–0.70 per piece). Thread cost ($0.02 per 1,000 stitches). At 9,000 SPI, thread cost per logo = $0.18. Backing material ($0.15 per piece). Total landed for 500 units: $3.80–5.50 per piece. The hidden cost: rejects from tension drift. Budget 3% scrap rate.
6. Engineering Benchmark Profiles: AATCC/ASTM Lab Threshold Metrics
Supplier claims mean nothing without test data. These are the pass/fail thresholds your quality contract must reference for each print method.
| Test Method | Screen Print (plastisol) | DTF (75 micron) | Sublimation (100% polyester) | Heat Transfer (vinyl) | Embroidery (9,000 SPI) |
|---|---|---|---|---|---|
| AATCC TM61 – Wash (5 cycles, 120°F) | Color change ≥4.0; no edge cracking | Peel edge lift ≤0.5mm; no film cracks | Color change ≥4.0; no migration | No vinyl edge lift; no adhesive residue | Color change ≥4.0; no loose threads |
| AATCC TM8 – Crocking (wet & dry) | Dry 4.0, Wet 3.5 | Dry 4.0, Wet 3.5 | Dry 4.5, Wet 4.0 | Dry 4.0, Wet 3.0 | Dry 4.5, Wet 4.0 (no dye transfer) |
| ASTM D751 – Adhesion Peel (lb/in) | ≥3.0 lb/in (scrape adhesion) | ≥2.5 lb/in (after 5 washes) | Not applicable | ≥2.0 lb/in (peel at 180°) | Not applicable |
| AATCC TM135 – Dimensional Change | Print area ≤2% vs body ≤2% | ≤2% differential | ≤2% for print area | ≤2% differential | Logo area ≤1.5% vs body ≤2% |
Interpretation: A rating of 4.0 on the AATCC gray scale means slight change visible to a trained eye but acceptable for most programs. Below 3.5 means the end user will notice fading or cracking within 10 washes. Do not sign a production PO without seeing third-party lab reports or in-house data from these methods.
7. Fatal Sourcing Gaps: Destructive Blindspots in Quality Control
Your receiving dock QC is likely missing these three failure modes. They require destructive testing – cutting into sample garments from every production lot.
Screen print under-cure detection: Take a printed garment, fold the print onto itself, and press firmly for 10 seconds. If the print sticks to itself or leaves a tacky residue on your finger, the plastisol was under-cured (below 320°F). Under-cured prints crack within 10 washes. Reject the entire lot if more than 1 of 20 samples shows tackiness.
DTF film shear fatigue: Mark a 2” square on the DTF print. Stretch the fabric biaxially to 20% elongation for 1,000 cycles on a fatigue tester (or manually 50 times if no tester). Inspect under 10x loupe. Any micro-cracks along the film edges indicate the polyurethane matrix lacks sufficient elongation. Do not approve production.
Sublimation ghosting on seam folds: During calendaring, seam overlaps create uneven pressure. Unfold the seam of a sublimated garment. If you see a lighter strip exactly where the seam was folded, the supplier did not use a seam pad or oversize paper. That ghosting will not wash out. It is a permanent defect. Audit the first 10 pieces off the calendar for seam alignment.
8. Supply Chain FAQ Summary: Verified Action Ledger FAQ
Q: What is the maximum wash cycle survival for DTF on 100% cotton tank tops used for fitness training?
A: 25–35 cycles in commercial laundry (140°F, 50G extraction) before edge lift exceeds 1mm. After 40 cycles, expect 30% of prints to show delamination at high-flex zones. For fitness apparel with frequent washing, screen print or sublimation (on polyester) lasts 50+ cycles.
Q: Can heat transfer vinyl be used on 100% nylon performance tank tops?
A: Yes, but only with low-temperature polyurethane adhesive (cure at 260°F instead of 320°F). Nylon melts at 400°F, but standard HTV cure at 320°F is safe. However, nylon’s low surface energy (38 dynes/cm) reduces adhesion. Test AATCC TM61 on 5 samples before bulk. Expect 20–25 cycle survival.
Q: How many wash cycles should a sublimated polyester tank top survive in a residential washing machine?
A: 75–100 cycles before noticeable fade (ΔE >3.0 on a spectrophotometer). The cross-linked dye-polymer matrix is inside the fiber, so abrasion does not remove color. Fade comes from chlorine bleach degrading the polyester itself, not the dye. Avoid bleach.
Q: What is the real-world MOQ for screen print if I only need 100 custom tank tops?
A: 100 pieces is below efficiency threshold for automatic carousel presses. Expect $45–65 setup fee per color plus $2.00–3.00 per print. Alternative: DTF at $1.80–2.50 per print with zero setup – cheaper for 100 units if your art has more than 2 colors.
Q: How do I verify a supplier’s claimed AATCC wash rating without sending to a lab?
A: Run a 5-cycle home wash at 120°F with standard detergent. After each cycle, inspect for edge lift (DTF/HTV), cracking (screen print), or color migration (sublimation on blends). Compare to an unwashed control. If visible degradation appears before cycle 5, the supplier’s data is falsified.
Q: Which print method has the lowest total cost of ownership for 1,500 units of cotton tank tops with a 4-color logo?
A: Screen print. Setup: 4 colors × $50 = $200 amortized across 1,500 units = $0.13 per piece. Print cost: $0.35 per piece. Total: $0.48 per print. DTF would be $1.20–1.80 per print with no setup – 2.5x higher. Sublimation not possible on cotton. Embroidery not practical for 4-color gradients.