Custom Logo Placement Guide: B2B Apparel Sourcing & Decoration
1. Sourcing Realities: What B2B Procurement Managers Overlook Regarding Custom Logo Placement
You are sourcing 1,000 t-shirts for a global tech summit. The design is complex: a gradient logo that must look sharp on every employee. You get the samples, and they look flawless on a white cotton shirt. But the final order is on black performance polyester. When the shipment arrives, the white parts of the logo are pink. Welcome to thermoplastic dye migration. Generic procurement advice fails to prepare you for the physics of dye movement in synthetic fibers. In B2B apparel sourcing, a logo isn't just a design; it is an engineering problem. The wrong placement or method on the wrong fabric can ruin a multi-thousand-dollar program. This guide is a reality check for buyers who need to bridge the gap between a designer's mockup and a factory's output.
Let's get one thing straight: the lookbook is a lie. The glossy images show a crisp print on a perfectly flat shirt. In reality, a t-shirt is a three-dimensional object that stretches, twists, and wrinkles. A logo placed incorrectly on the chest looks crooked when the wearer moves. This is why defining technical parameters is not optional. You need to think about "Centimeter Graphic Positioning Protocol." This specifies the exact distance from the top of the collar to the bottom of the logo. For a standard left-chest logo, it is typically 8-10 cm down from the shoulder seam. Without this, the operator will align the logo visually. This leads to a drift of 1-2 cm between garments, making your uniforms look inconsistent.
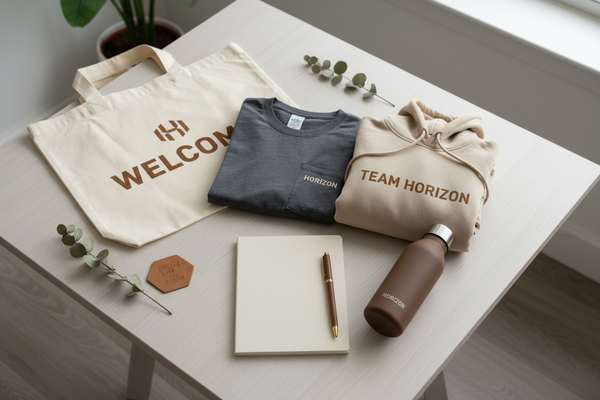
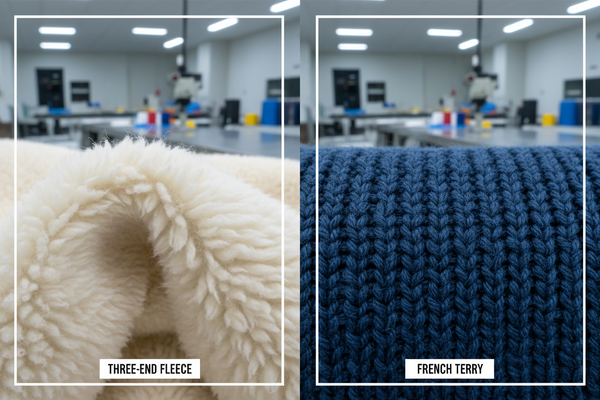
Furthermore, the fabric you choose dictates the success of your decoration. For a tech startup swag pack, you want garments that software engineers will wear. That means soft, breathable, but durable. You need to resist the urge to buy the cheapest 140 GSM shirt. Opt for a 180 GSM ring-spun combed cotton for softness, or a 65/35 poly-cotton blend for durability and wrinkle resistance. The weight matters. A 160 GSM shirt is flimsy; a 200 GSM shirt is heavy and feels premium. For a global event, you need to conduct "climate tracking loops." If the event is in Singapore, you need lightweight, moisture-wicking fabric. If it's in New York in winter, a heavy 220 GSM cotton is necessary. Ignoring this is a fatal flaw.
2. Textile Physics: The Structural Science Behind Cotton vs. Polyester Blends
Understanding the substrate is the first step to correct logo placement. The substrate is the base material. There are two primary families: cellulose-based (Cotton) and synthetic-based (Polyester). Cotton is a natural fiber. It has hydroxyl groups that love water. This makes it easy to dye with reactive dyes. The dye bonds with the fiber. When you screen print on cotton, the plastisol ink sits on the surface. The ink cures and mechanically locks onto the cotton fibers. This is a mechanical bond. For DTF, the hot-melt adhesive is designed to melt into the cotton's porous structure. However, cotton shrinks (around 5-7% on the first wash). This shrinkage creates stress on the print. If the polymer used in screen print or DTF is not elastic enough, it cracks under the shrinking tension. This is known as "Cross-Grain Strain" failure.
Polyester is a different beast. It is a thermoplastic polymer. When you dye it, you use Disperse Dyes. These dyes are insoluble in water. You heat the polyester, the polymer chains open up, and the dye molecules enter the lattice. The dye is trapped inside the fiber. This is called "Thermoplastic Disperse Dyeing." The problem is that this dye is heat-sensitive. If you apply a heat press to a polyester shirt at 160°C (320°F) to cure a DTF or screen print, the dye molecules in the polyester can vibrate and turn into a gas. This gas migrates through the polymer matrix of the ink or adhesive. It condenses on the surface of the white ink. This is "Thermoplastic Dye Migration." The result is a pink or yellow stain on a white logo. This is one of the most expensive mistakes you can make.
To mitigate this, you need a barrier. This is where "Substrate Polymer Cross-Linking" comes into play. In screen printing, you can use a "low-bleed" or "migration-blocking" underbase. The chemical composition of this underbase is designed to trap the gas before it reaches the top colors. For DTF, you need a hot-melt adhesive that melts at a lower temperature (around 120°C). A lower temperature prevents the polyester from releasing its dye. So, when buying DTF films, you must specify the "melt temperature." For polyester, you want a low-temp adhesive. For cotton, a standard adhesive is fine. Track this matrix compatibility list. This is the core of B2B apparel sourcing parameters.
3. Workshop Execution: Calibrating Screen Print, DTF, Sublimation, and Embroidery Output Lines
Now we move to the workshop. The decoration method chosen dictates the operational requirements on the shop floor. Let's examine the "Big Four": Screen Print, DTF, Sublimation, and Embroidery.
Screen Printing (Plastisol): This is the volume king. A screen is created for each color. The ink is pushed through the mesh. The crucial step is the "Flash" and "Cure." The shirt must pass through a gas dryer (or tunnel oven) that reaches the cure point (typically 160°C) for a specific dwell time (30-45 seconds). If the temperature is too low, the Plastisol Film Curing is incomplete. The ink remains soft and brittle. It will crack on the first wear. The pressure of the squeegee also matters. Too much pressure pushes the ink too deep into the fabric, causing "bleeding" at the edges. Too little pressure results in a thin, uneven deposit.
DTF (Direct-to-Film): This is the detail king. The printer prints the design onto a film. Then, a powder (adhesion polymer) is applied. The powder melts in the oven (curing). The film is pressed onto the garment. The pressure and temperature are critical. For "Long-Staple Combed Ring-Spun Yarns" (cotton), the surface is smooth, allowing for great adhesion. However, for polyester, the surface is slick. The adhesion polymer struggles to bond unless it is specifically designed for synthetic blends. You must verify the "adhesive activiation temperature." If the adhesive doesn't cross-link with the fabric, the design peels off after a wash.
Sublimation (All-Over Print): This is an ink transfer where heat and pressure turn the ink into a gas that bonds to the polyester. It is not a "sticky" material. The design is literally inside the fiber. This makes it incredibly durable. It doesn't crack or peel. However, it only works on 100% polyester (or very high blends like 85/15). This limits its use in "corporate clothing programs." Most corporate programs prefer a cotton feel. Sublimation also suffers from a high setup cost because the paper and ink are expensive.
Embroidery: This involves stitching thread into the fabric. The machine locks the thread into the fabric using a bobbin. The key issue is the "Needle Density." If you pack too many stitches (high density) into a small area on a lightweight shirt, you get "Puckering." The fabric ripples around the logo. This looks terrible. To prevent this, use a "Cutaway Stabilizer" on the back of the fabric to support the weight of the stitches. It is a premium method but adds 1.5x to the cost compared to screen printing.
4. Risk Factors: Preventing Severe Operational Flaws in Bulk Runs
The bulk production line is where risk compounds. A minor error in the sample becomes a massive error when multiplied by 5,000. The most common flaw is ignoring "Thermoplastic Dye Migration" trends. Black polyester is the worst offender. The black dye is the heaviest in terms of concentration. When you heat it, it bleeds aggressively. You must force the factory to conduct a "dye migration test" using a heat press at 150°C before production. They should press a white fabric patch against the black shirt and check for staining. If the patch turns pink, the dye is unstable.
Another operational flaw is relying on soft lookbook proofs without viewing heavy weight structural samples. A print might look good on a sample size small, but on a 2XL (which has a larger surface area), the logo may look too small. The sizing of the logo relative to the garment volume is essential. You must request a "Pre-Production Physical Master Sample" on the exact GSM and fabric blend you will use for production. Do not accept a mock-up. Hold it. Stretch it. Feel the drape.
Finally, poor planning regarding the "Centimeter Graphic Positioning Protocol" can ruin a uniform. If the logo is placed at the same height in centimeters (e.g., 8 cm from the collar), it will look different on a small size compared to a large size because the proportional chest width changes. On a small, 8 cm is 30% of the chest width; on a large, it is 20%. This makes the logo look lower on the large shirt. Advanced buyers scale the position based on the size. They might use a percentage formula (e.g., 20% of chest width down from the shoulder). This is the only way to ensure the placement looks identical across all sizes.
5. Procurement Ledger: Cost Amortization Specs for Bulk Poly-Cotton Drops
The unit cost is the sum of the base material cost plus the decoration cost divided by the volume. Let's break it down. For a standard 180 GSM 65/35 poly-cotton shirt, the garment cost is about $3.50 - $5.00 (depending on the mill). Now, you add decoration. Screen Printing setup costs $25 - $35 per screen. For a 6-color logo, that is $180. If you are printing 100 shirts, that's $1.80 per shirt just for setup. For 1,000 shirts, it drops to $0.18 per shirt. So, screen printing unit cost is highly volume-dependent. DTF has a lower setup cost (around $20 for the film artwork), but the material cost per print is higher. The powder and film cost around $0.70 per A3 print. This unit cost is relatively static. For 100 shirts, DTF is cheaper. For 1,000, screen printing is cheaper.
Embroidery is the most expensive. The setup involves digitizing the logo ($40). Then the thread cost and time. A standard 15,000 stitch logo takes about 15 minutes to sew. At a factory rate of $30/hour, you are looking at $7.50 per shirt just for the sewing time. This is why embroidery is reserved for premium programs (jackets, polos).
You must also factor in the "Rejection Rate." A factory might have a 3% rejection rate on screen printing due to misprints. They will reprint, but you pay for the materials. For DTF, the rejection rate is lower (1%) because of digital control. When determining the total landed cost, you must "Execute cross-grain strain performance analysis prior to volume cutting runs." If you test the ink's adhesion at the stretch points, you can reduce the rejection rate. This testing costs 2-3 hours of labor but prevents thousands of dollars in losses later. Also, look at the packaging. Bulk packing is cheap, but retail-ready packaging (individual poly bags) adds 30-50 cents per unit. For the "Tech startup enterprise employee onboarding swag," individual packaging is a requirement to present a professional product.
6. Engineering Benchmark Profiles: AATCC/ASTM Lab Threshold Metrics
You need objective standards to measure quality. Here are the key AATCC/ASTM thresholds you need to enforce for custom apparel.
| Test Method | Standard | Acceptable Threshold | Failure Consequence |
|---|---|---|---|
| Colorfastness to Crocking (Rubbing) | AATCC 8 | Grade 4 (Wet) / Grade 4 (Dry) | Dye rubs off on walls or other clothing. Indicates poor "Wet Crocking Friction Scale" performance. |
| Dimensional Stability (Shrinkage) | AATCC 135 | ± 5% length / ± 3% width | Garments shrink. Logos distort relative to the new dimensions. |
| Dye Migration (Heat Resistance) | AATCC 117 | Grade 4 (No Bleed) | Dye bleeds into the print. Visible stain. Total product failure. |
| Adhesion (Wash Durability) | AATCC 61 | No cracking/peeling after 5 washes | Print delaminates from the fabric. |
Pay special attention to AATCC 8 for Crocking. This is the "Wet Crocking Friction Scale." If the dye rubs off when wet, it's a manufacturing defect. For polyester, you must request the Dye Migration test. These metrics are your insurance. They protect you from accepting a shipment that will fail in the field. When you see these reports, you are not relying on a lookbook; you are relying on science.
7. Fatal Sourcing Gaps: Destructive Blindspots in Quality Control
The gap between the proof and the product often lies in the fabric weight. Buyers frequently ignore "Fabric Weight Grammage Variance." A "180 GSM" shirt should actually weigh 180 grams per square meter. However, the tolerance is ± 5%. If the factory runs the batch at 170 GSM (the lower tolerance), the shirt is thinner. This thinness allows the light to pass through, making the shirt look cheap. It also affects the print. A thin fabric with a heavy screen print will curl or "tent" because the ink layer is stiffer than the fabric. This is a fatal blindspot.
Another gap is the "Pre-Production Physical Master Sample." Lookbook proofs are digital files. They hide the hand-feel. A sample might look perfect on a computer screen, but in reality, the print is stiff and heavy. You need to feel it. You need to stretch it. You need to perform a "Cross-Grain Strain" test. Grab the logo with both hands and stretch it 20%. If the ink cracks or the DTF powder shows "crazing" (hairline cracks), the polymer cross-linking is insufficient. This is a sign that the factory rushed the curing process.
Finally, the "Backboard" issue. The heat transfer process requires a hard backboard (the platens). If the board is too hard, it pushes the fabric into the polymer, but the heat dispersion might be uneven. If the board is too soft, the pressure drops. If your logo feels like a piece of plastic rather than part of the fabric, the heat was too high or the pressure too low. The "Track matrix compatibility lists between print polymers and backboard elements" ensures the heat transfer is balanced. You must also watch the production speed. If the machine runs too fast, the dwell time in the heat press is reduced, leading to poor curing. A 3-second dwell time is insufficient for plastisol; you need 8-12 seconds for proper cross-linking.
8. Supply Chain FAQ Summary: Verified Action Ledger FAQ
How do we determine the correct fabric weight for a global team?
Conduct a climate tracking loop. For temperate regions (North America, Europe), use 180-200 GSM. For hot climates (SE Asia, Middle East), use 150-160 GSM. The weight affects the "hand-feel" and the drape of the logo. Always specify the GSM in your PO.
What is the specific heat press temperature to prevent dye migration on black polyester?
For polyester, use a lower temperature. Standard screen print curing is 160°C. For DTF on polyester, use 145-150°C to avoid activating the disperse dyes. The dwell time should be shorter (10 seconds) rather than longer. This is the "Low-Temp" protocol.
Why does my white DTF logo turn yellow after a week in storage?
That is Thermoplastic Dye Migration. It can happen slowly over time if the dye gases are trapped in the adhesive. The adhesive polymer acts as a sponge. It happens even without re-heating if the ambient temperature is high. To fix this, insist on a "migration-blocking" adhesive layer.
What is the cost variance between screen print and DTF for a 2,000-piece order?
For 2,000 units, screen printing setup costs ($180) amortize to $0.09/unit. Ink and labor costs ~$1.20/unit. Total ~$1.29/unit. DTF: material cost ~$1.50/unit with lower setup. Screen printing saves about 15% on the decoration cost at this volume.